
Movie Recommender System Using PySpark
Explore the world of cinema with our cutting-edge PySpark movie recommender system that provides tailored movie suggestions to match your unique tastes and preferences.

Have you ever wondered how Netflix recommends movies to you based on your watch history or how Amazon recommends products based on your past purchases or browsing history?
These recommendations are thoroughly crafted results through various algorithms built on user's data and such algorithms are referred to as Recommender Systems. These have become an integral part of many online platforms, providing personalized recommendations to users based on their preferences and behavior. In this article, we'll explore how to build a movie recommender system using PySpark, a powerful framework for distributed computing in Python.
Let us start by knowing what types of systems exist!
Types of Recommender Systems
There are mainly two types for building recommender systems based on the filtering process, which are:
- Collaborative Filtering
- Content-Based Filtering
Let us deep dive into understanding what they are all about:
a. Collaborative Filtering
Collaborative filtering is a popular technique used in recommender systems to make predictions about user preferences by leveraging the collective wisdom of users.
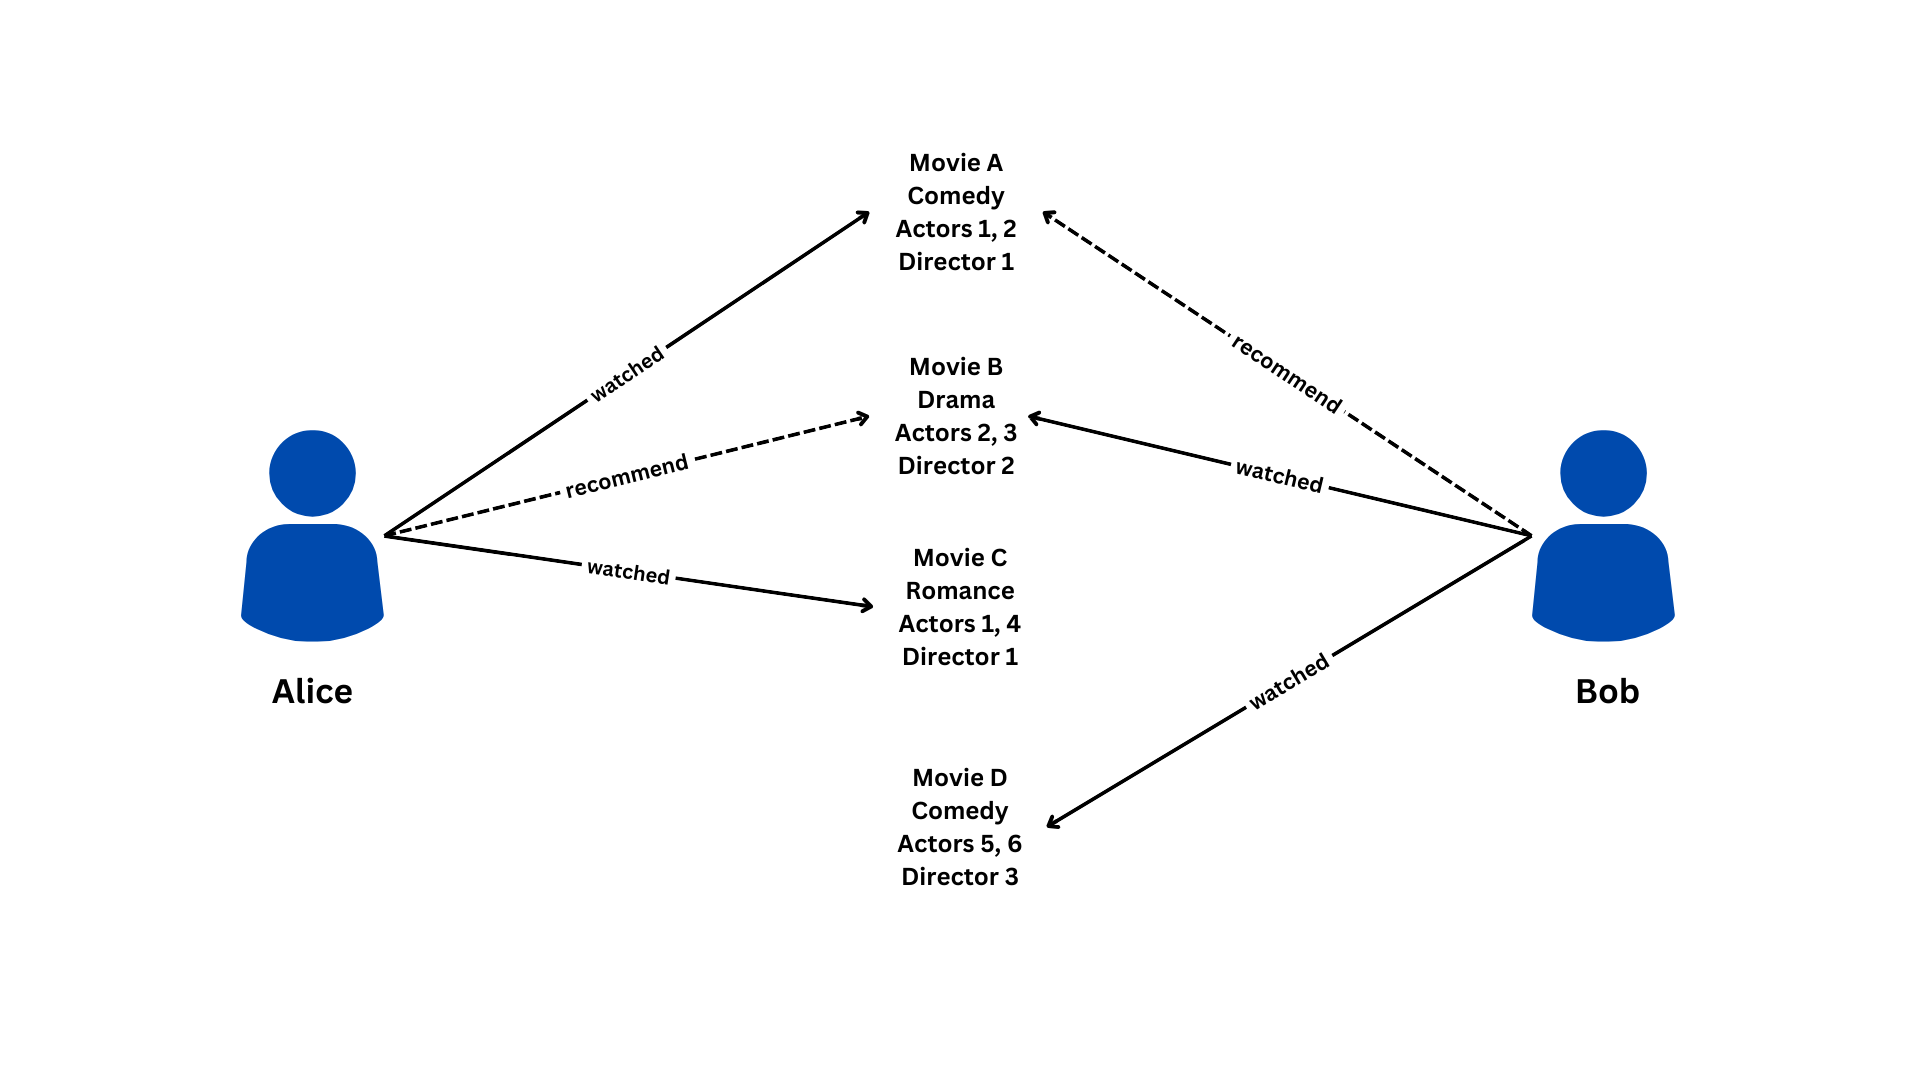
For example, let's say there are two users, Alice and Bob. Alice has watched movies A, B, and C, while Bob has watched movies B, C, and D. Collaborative filtering predicts that since Alice and Bob both watched movies B and C, Alice might also like to watch movie D, and Bob might also like to watch movie A.
In this example, collaborative filtering analyzes the watched history of multiple users to find similarities in their preferences. It then uses these similarities to make predictions about new items (movies in this case) that a user might like to watch based on the preferences of similar users.
This method is particularly useful when individual user data is limited or sparse, as it leverages the collective preferences of many users to make recommendations.

One of the common approaches to collaborative filtering is Alternating Least Squares (ALS), which is well-suited for large-scale recommendation problems(We would be building a Collaborative Filtering recommender system in this article)
For further knowledge and ideas on this topic, a good overview can be found below.


b. Content-Based Filtering
Content-based filtering is a recommendation technique used in recommender systems to suggest items (such as movies, articles, products, etc.) to users based on the features or characteristics of those items and the user's preferences. Unlike collaborative filtering, which relies on the behavior and preferences of other users, content-based filtering focuses on the properties of the items themselves.
Using the same example of Alice and Bob:
Let's say we have information about the genre, actors, and directors of the movies they have watched:
- Movie A (Genre: Comedy, Actors: Actor1, Actor2, Director: Director1)
- Movie B (Genre: Drama, Actors: Actor2, Actor3, Director: Director2)
- Movie C (Genre: Romance, Actors: Actor1, Actor4, Director: Director1)
- Movie D (Genre: Comedy, Actors: Actor5, Actor6, Director: Director3)
In content-based filtering:
- For Alice, since she liked movies with the genres "Comedy" (Movie A) and "Romance" (Movie C), the system might recommend other movies with similar genres, actors, or directors, such as another comedy movie with the same director as Movie A.
- For Bob, since he watched movies in the genre "Drama" (Movie B) and "Comedy" (Movie D), the system might recommend other movies with similar characteristics, such as another comedy movie featuring the same actors as Movie D.
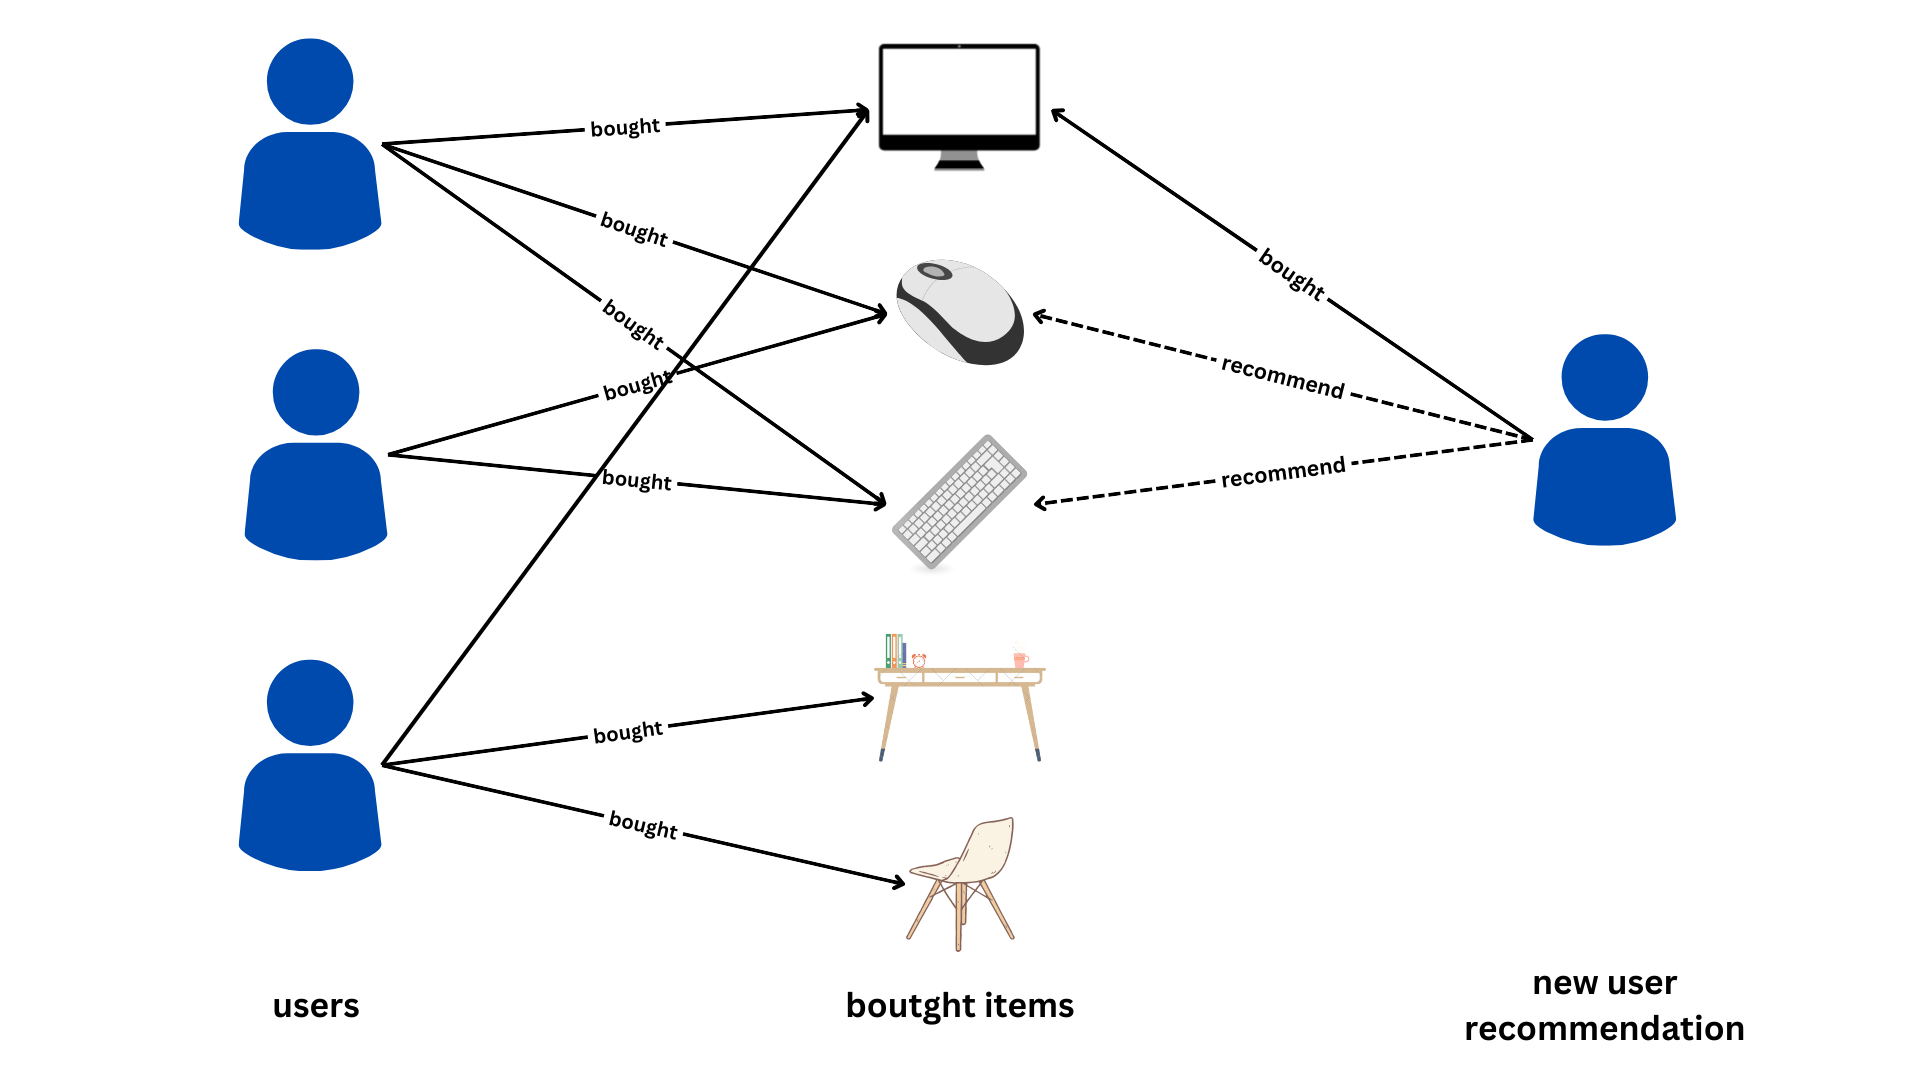
Another example below includes recommendations based on shopping patterns or things bought, where people who bought a monitor are recommended to buy a mouse, keyboard, study table, or chair.
In this approach, recommendations are made by comparing the characteristics or features of items (movies) with the user's preferences, as inferred from the items they have already watched.
Content-based filtering is particularly useful when there is limited or no data about other users' preferences, as it relies solely on the attributes of the items themselves to make recommendations.
To have a greater understanding on more real life applications in the tech world, you can read how Meta develops cutting-edge recommendation engines across their product portfolio from the articles below!


 Vladislav Vorotilov
Now that we've gathered some idea on filtering, let's get started with hands-on experience building a recommender systems using PySpark!
Step 1: Downloading the dataset
To get started, we'll be using a collection of datasets which contain the movie title, ratings, links and tags. The dataset can be downloaded from here(click here).
Alternatively, you can also download the dataset directly from below:


Step 2: Setting Up the PySpark notebook using Docker
For instructions on configuring the PySpark Notebook with Docker, see the blog post below. The blog offers a step-by-step guide that will walk you through the process of installing the Notebook on your browser and obtaining an image from Docker Hub.
sparkdata directory that is explained in the step 2 of the below blog! Data Science FM
Step 3: Creating a PySpark Session
Now that we have set up the environment, we can import the dependencies and start a Spark session.
# import the required libraries
import time
import pyspark
from pyspark.sql import SparkSession
spark = SparkSession.builder.appName('recommendation').getOrCreate()
Our code sets up a PySpark environment, it imports necessary libraries & initializes a SparkSession named 'recommendation'. The getOrCreate() method ensures that if an existing SparkSession exists, it is retrieved; otherwise, a new one is created.
Access Our Spark Cluster
Interested in enhancing your data engineering skills? Apply now to gain access to our Spark cluster:
- Hands-on Learning: Experience the power of learning on an actual Spark cluster.
- End-to-End Workflows: Build and test complete data processing workflows.
- Jupyter Notebooks: Use Jupyter Notebooks to write and test your PySpark and SparkSQL code.
- Curriculum Access: From beginner to advanced, follow a structured curriculum to solve complex problems.
- Industry Datasets: Work with datasets like Movie Lens for recommender systems and Common Crawl for NLP tasks. And many more datasets available.
Step 4: Loading and Preprocessing Data
# load the datasets using pyspark
movies = spark.read.load("/sparkdata/movies.csv", format='csv', header = True)
ratings = spark.read.load('/sparkdata/ratings.csv', format='csv', header = True)
links = spark.read.load("/sparkdata/links.csv", format='csv', header = True)
tags = spark.read.load("/sparkdata/tags.csv", format='csv', header = True)
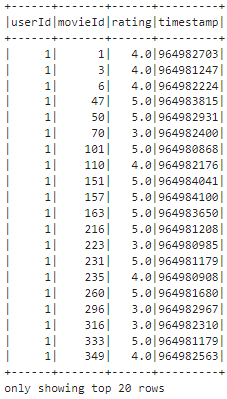
ratings.show()After importing the necessary libraries, we use the load function to load the 4 datasets into 4 different dataframes. Next, we use the show() method to display the top 20 rows of the ratings dataset, providing a quick glimpse of its structure and contents.
Output:
Moving onto the schema, we verify if the data imported is read in the right format. If not imported in the right format then a modification/conversion of the data types are needed to avoid incorrectly read features.
# print the schema to understand the data types of features
ratings = ratings.select("userId", "movieId", "rating")
ratings.printSchema()
Output:
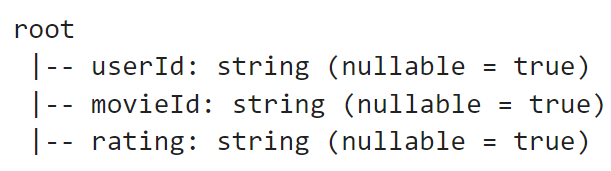
The columns userId, movieId, and rating are being read as strings, we will convert the data type of the columns into integers and floats using cast and withColumn.
# convert the data type to integer and float
df = ratings.withColumn('userId', ratings['userId'].cast('int')).\
withColumn('movieId', ratings['movieId'].cast('int')).withColumn('rating', ratings['rating'].cast('float'))
df.printSchema()
Output:
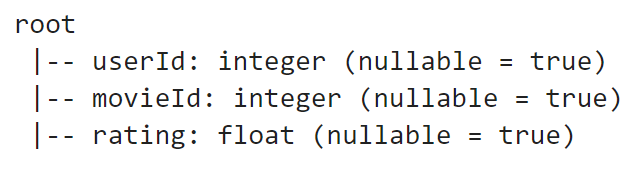
We can see that the userId, movieId, and rating are converted into their respective data types.
Coming to a really important step, we are now splitting the data into training, validation and test sets in the ratio 60:20:20.
# split the data into train, validation and test sets
train, validation, test = df.randomSplit([0.6,0.2,0.2], seed = 0)
print("The number of ratings in each set: {}, {}, {}".format(train.count(), validation.count(), test.count()))
Output:

We can note that the train records are 60435, validation records are 20052 and test records are 20349.
Step 5: Model Training and Validation
Next, we'll train the recommender model using ALS on the training data.
The Alternating Least Squares (ALS) algorithm is a widely used collaborative filtering technique in recommender systems. ALS works by factorizing the user-item interaction matrix into two lower-dimensional matrices: one representing user preferences and the other representing item attributes.
It alternates between updating these two matrices until convergence, optimizing the reconstruction error of the observed user-item interactions. By decomposing the original matrix into latent factors, ALS captures the underlying patterns and preferences in the data, enabling it to make personalized recommendations.
Before training, we shall define RMSE function to calculate the Root Mean Square Error (RMSE) for a set of predictions. We do it by first computing the squared differences between actual ratings and predicted ratings, after that we calculate the mean squared error (MSE) and return the square root of MSE as the RMSE value.
from pyspark.sql.functions import col, sqrt
def RMSE(predictions):
    squared_diff = predictions.withColumn("squared_diff", pow(col("rating") - col("prediction"), 2))
    mse = squared_diff.selectExpr("mean(squared_diff) as mse").first().mse
    return mse ** 0.5
All things set, we'll move on to use Grid Search to find hyperparameters such as rank, regularization parameters, and iterations. The below function implements Grid Search to find the best model.
# implement the model using ALS algorithm and find the right hyperparameters using Grid Search
from pyspark.ml.recommendation import ALS

def GridSearch(train, valid, num_iterations, reg_param, n_factors):
    min_rmse = float('inf')
    best_n = -1
    best_reg = 0
    best_model = None
    # run Grid Search for all the parameter defined in the range in a loop
    for n in n_factors:
        for reg in reg_param:
            als = ALS(rank = n,
                      maxIter = num_iterations,
                      seed = 0,
                      regParam = reg,
                      userCol="userId",
                      itemCol="movieId",
                      ratingCol="rating",
                      coldStartStrategy="drop")
            model = als.fit(train)
            predictions = model.transform(valid)
            rmse = RMSE(predictions)
            print('{} latent factors and regularization = {}: validation RMSE is {}'.format(n, reg, rmse))
            # track the best model using RMSE
            if rmse < min_rmse:
                min_rmse = rmse
                best_n = n
                best_reg = reg
                best_model = model

    pred = best_model.transform(train)
    train_rmse = RMSE(pred)
    # best model and its metrics
    print('\nThe best model has {} latent factors and regularization = {}:'.format(best_n, best_reg))
    print('traning RMSE is {}; validation RMSE is {}'.format(train_rmse, min_rmse))
    return best_model
The implementation of the GridSearch function takes training and validation datasets along with lists of hyperparameters (num_iterations, reg_param, n_factors) to explore. It iterates through all combinations of these hyperparameters and trains ALS models using PySpark's ALS class. For each model, it calculates the RMSE (Root Mean Square Error) on the validation set using the RMSE function. The model with the lowest RMSE is considered the best. Finally, the function prints out the RMSE values for different parameter combinations and returns the best model.
Let us build the model using the Grid Search implemented above. We will submit the train and validation datasets for training and validation respectively.
# build the model using different ranges for Grid Search
from pyspark.sql.functions import col, sqrt
num_iterations = 10
ranks = [6, 8, 10, 12]
reg_params = [0.05, 0.1, 0.2, 0.4, 0.8]

start_time = time.time()
final_model = GridSearch(train, validation, num_iterations, reg_params, ranks)
print('Total Runtime: {:.2f} seconds'.format(time.time() - start_time))
Output:

The overall runtime was around 64 seconds and the best model has a training RMSE of 0.69 and validation RMSE of 0.89.
Let us run the model on the Test set and measure the performance using RMSE.
# test the accuracy of the model on test set using RMSE
pred_test = final_model.transform(test)
print('The testing RMSE is ' + str(RMSE(pred_test)))
Output:

The RMSE on the Test set is 89.59.
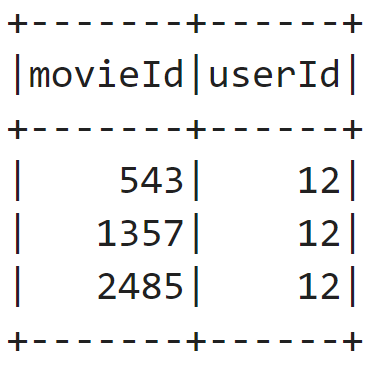
Step 6: Testing the recommendations for a Single User
Before carrying on, to submit the test to a model for a single user and obtain movie recommendations, we first check the user behavior of rating the movies they've watched and then compare those with the recommendations from the model. The below table shows the movies rated by the user.
# test for a single user
single_user = test.filter(test['userId']==12).select(['movieId','userId'])
single_user.show()
Output:
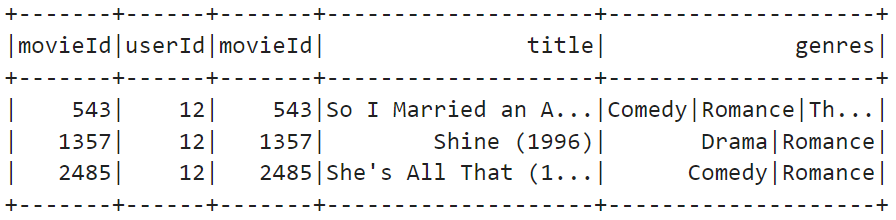
Let us write a query to fetch the names of the movies from the movies dataframe. We will need to inner join the single_user dataframe and movies dataframe on movieId to get the names of the movies.
# fetch the names of the movies
single_user.join(movies, single_user.movieId == movies.movieId, 'inner').show()
Output:
It is time to put our custom recommendation engine to the test!
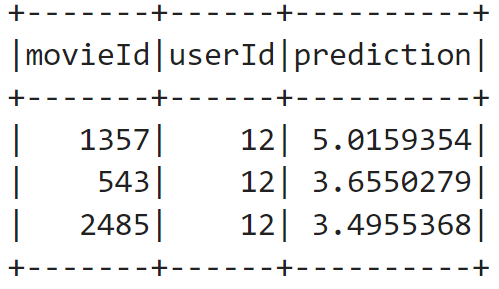
We submit the single user data to the model using transform() function that is similar to predict() method in sklearn. We will order the results in the descending order of the prediction of the ratings.
# verify the prediction rating for the user
reccomendations = final_model.transform(single_user)
reccomendations.orderBy('prediction',ascending=False).show()
Output:
Now we fetch the names of the movies similar to how we did the same for the single user rating above.
# fetch the names of the movies
reccomendations.join(movies, reccomendations.movieId == movies.movieId, 'inner').show()
Output:

The model demonstrates satisfactory performance by accurately predicting ratings for all the movies, closely matching the user's actual preferences.
Step 7: Providing the recommendations to the user
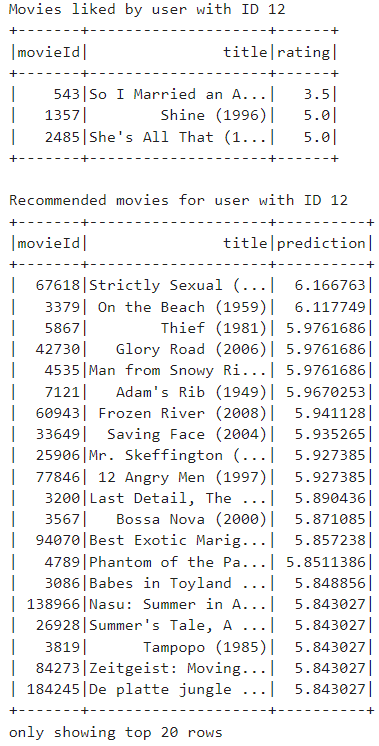
Now, we shall be recommending the user those movies which they haven't rated or seen before!
from pyspark.sql.functions import col, lit

# select a single user from the test set
user_id = 12
single_user_ratings = test.filter(test['userId'] == user_id).select(['movieId', 'userId', 'rating'])

# display the movies the user has liked
print("Movies liked by user with ID", user_id)
single_user_ratings.join(movies, 'movieId').select('movieId', 'title', 'rating').show()

# generate recommendations for the user
all_movies = df.select('movieId').distinct()
user_movies = single_user_ratings.select('movieId').distinct()
movies_to_recommend = all_movies.subtract(user_movies)

# predict ratings for movies the user has not rated yet
recommendations = final_model.transform(movies_to_recommend.withColumn('userId', lit(user_id)))

# filter out the movies that the user has already rated or seen (this filters out the movies that the user has not liked as well)
recommendations = recommendations.filter(col('prediction') > 0)

# display the recommendations with movie names
print("Recommended movies for user with ID", user_id)
recommended_movies = recommendations.join(movies, 'movieId').select('movieId', 'title', 'prediction')

# Sort recommended movies by prediction in descending order
ordered_recommendations = recommended_movies.orderBy(col('prediction').desc())

# Display the ordered recommendations
ordered_recommendations.show()
We begin by selecting all the ratings made by the user with ID 12 from the test set and displays the movies the user has already liked, including their movie ID, title, and rating.
Next, the code generates recommendations for the user by creating a DataFrame containing all distinct movie IDs in the dataset and another DataFrame containing the movie IDs that the user has already rated. It then predicts ratings for the movies that the user has not yet rated using a collaborative filtering model and filters out any movies from the recommendations that the user has already rated.
Finally, it displays the top recommended movies for the user, including their movie ID, title, and predicted rating, sorted in descending order based on the predicted ratings.
Output:
Conclusion
Through this blog, we've illustrated the process of constructing a movie recommender system using PySpark and collaborative filtering with ALS. We have effectively managed to execute extensive recommendation tasks, delivering personalized movie suggestions to users.
You can also checkout a similar blog for News Recommendations using PySpark!
Ninaad P S
Before you leave, do not forget to subscribe to our newsletter! It contains the latest updates and insights happening in the world of AI!

Enjoy the journey of learning and building with PySpark!


