Zero to Spark - BigBanyanTree Cluster Setup
This blog details the setup of an Apache Spark cluster in standalone mode for data engineering using Docker compose on a dedicated Hetzner server. It also covers the setup of other utilities such as Jupyterlab and Llama-3.1 8B LLM service.

This blog is part of the BigBanyanTree Spark cluster project series, an initiative designed to help colleges set up their data engineering clusters using Apache Spark. In this instalment, we’ll walk through the process of setting up a dedicated server with Apache Spark, complete with a JupyterLab interface and an LLM service powered by llamafile.
Hardware
For the hardware, we decided to go with a dedicated server from Hetzner. We considered using cloud services such as Google Cloud or AWS but opted for the freedom and flexibility that comes with using a dedicated server instead.
The particular server we are using has the following configuration:
- 64 GB DDR4 RAM
- 2 x 512 GB NVMe SSD (Gen4)
- Intel Core i5-13500 processor with 6 performance cores, 8 efficiency cores
- 1 GBit/s Bandwidth
The server is configured with Ubuntu 24.04 (LTS), along with RAID-1 for fault tolerance. For additional security, all public access to the server is disabled except for SSH key-based authentication. Further, all software that needs public access is placed behind Cloudflare tunnels with PIN-based login, which mainly includes the Jupyterlab interface.
Now let's see turn our attention to Apache Spark.
Apache Spark
The main idea behind Spark is to carry out parallel computations. When you initiate a Spark job, it divides your data into smaller partitions and sends them to the worker nodes in the cluster. It also divides the job into smaller tasks, and each worker performs these tasks with the data it has been given. Once all the tasks have been completed, the worker nodes send the results to the driver node, which is responsible for gathering all the results from individual tasks and compiling them into a final output.
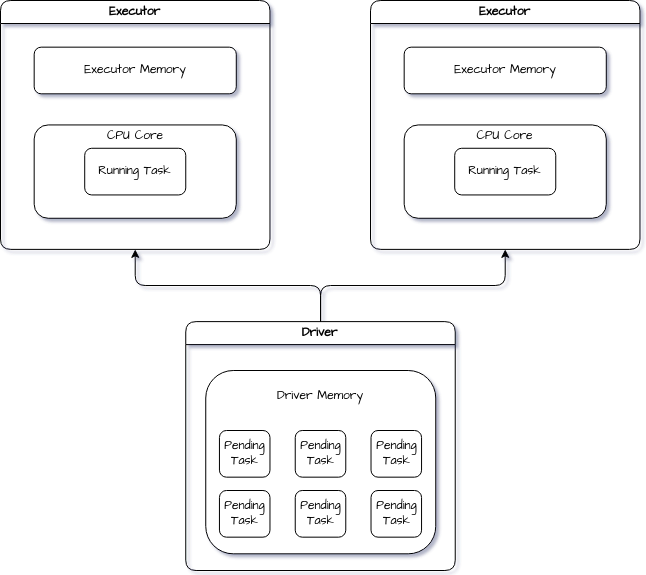
In this diagram, you can see the two main components of Spark: the driver and the executor.
Driver
The driver is a crucial component of Spark's architecture, acting as the control centre of your Spark application, organizing various tasks, and returning the final result. The driver program doesn't perform any computation but orders the workers to process data synchronised.
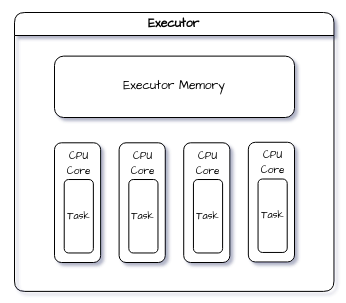
Executor
A worker node in a Spark cluster has physical resources such as CPU cores and RAM, which are utilized by executors to carry out their assigned tasks, under the guidance of the driver program. Each task is performed in a separate process, and each executor is a separate process running in a work node.
But each executor can run multiple tasks simultaneously, acting like a mini-worker node of sorts.
Cluster Mode
Spark has different modes in which it can be deployed and operated. These modes reference the different types of cluster managers which can be used in tandem with Apache Spark to manage the cluster, performing jobs such as resource allocation and task orchestration.
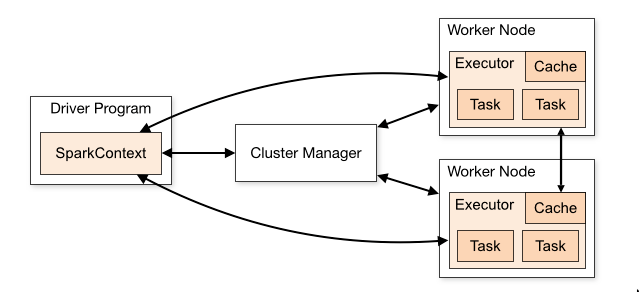
The cluster managers available for use with Apache Spark are:
- Standalone - this is Spark's inbuilt cluster manager
- Hadoop YARN - this is the resource manager used by Hadoop 3
- Kubernetes - an open-source system for automating deployment, scaling, and management of containerized applications
For our particular use case, we make use of the cluster in Standalone mode.
Setup
To use the Spark cluster in standalone mode, we set up a docker image containing Apache Spark and Hadoop 3, along with other dependencies required for data engineering. We use the same docker image for both our master and worker nodes and use Docker Compose to orchestrate the different services.
First, we create a base image for all the services in our cluster, containing a basic Linux environment with Python 3.11 along with a mounted volume which serves as the shared working directory for Jupyterlab.
hetzner-base.Dockerfile
FROM python:3.11-bullseye AS hetzner-base

ARG shared_workspace=/opt/workspace

# Setup basic environment and python
RUN mkdir -p ${shared_workspace} && \
    apt-get update -y --fix-missing && \
    apt-get install -y --no-install-recommends \
    sudo \
    curl \
    vim \
    unzip \
    rsync \
    openjdk-11-jdk \
    build-essential \
    software-properties-common \
    ssh && \
    apt-get clean && \
    rm -rf /var/lib/apt/lists/*

ENV SHARED_WORKSPACE=${shared_workspace}

VOLUME ${shared_workspace}

CMD ["bash"]
Then we create a docker image for the master and worker node services of our Spark cluster. We use the base docker image and build on top of it, making use of a multi-stage build. This helps us reduce unnecessary bloat while ensuring required functionality. I have covered the topic of multi-stage builds in more detail here.
spark-cluster.Dockerfile
FROM python:3.11-bullseye AS python-slim

COPY requirements/requirements.txt .
RUN pip3 install --no-cache-dir -r requirements.txt

FROM hetzner-base

COPY --from=python-slim /usr/local/lib/python3.11/site-packages /usr/local/lib/python3.11/site-packages
COPY --from=python-slim /usr/local/bin /usr/local/bin

ENV SPARK_HOME="/opt/spark"
ENV HADOOP_HOME="/opt/hadoop"

ARG spark_version=3.5.1

RUN mkdir -p ${HADOOP_HOME} && mkdir -p ${SPARK_HOME}

WORKDIR ${SPARK_HOME}

RUN curl https://archive.apache.org/dist/spark/spark-${spark_version}/spark-${spark_version}-bin-hadoop3.tgz -o spark-${spark_version}-bin-hadoop3.tgz \
    && tar xvzf spark-${spark_version}-bin-hadoop3.tgz --directory /opt/spark --strip-components 1 \
    && rm -rf spark-${spark_version}-bin-hadoop3.tgz

ENV SPARK_VERSION=${spark_version}

ENV PATH="/opt/spark/sbin:/opt/spark/bin:${PATH}"
ENV SPARK_MASTER="spark://spark-master:7077"
ENV SPARK_MASTER_HOST="spark-master"
ENV SPARK_MASTER_PORT="7077"
ENV PYSPARK_PYTHON="python3"

COPY ./conf/spark-defaults.conf ${SPARK_HOME}/conf

RUN chmod u+x /opt/spark/sbin/* && \
    chmod u+x /opt/spark/bin/*

COPY entrypoint.sh /opt/spark/entrypoint.sh
RUN sudo chmod +x /opt/spark/entrypoint.sh

ENTRYPOINT ["/opt/spark/entrypoint.sh"]
Let's step through this dockerfile together:
- The first 3 lines use a Python 3.11 docker image as the base, then copy and install the python dependencies from our requirements.txt file.
- Then using our hetzner-base image, we copy the installed python dependencies from our Python 3.11 build to the hetzner-base build. This takes advantage of multi-stage builds, where we can copy selected dependencies from one stage to the other.
- From line number 11 - 21, we set up the installation directories for Hadoop and Apache Spark version 3.5.1 and downloaded and extracted them.
- From line number 25 - 31, we set up important environment variables for Apache Spark.
- Line 33 copies over some default configuration settings for Spark.
- The command on line 35 grants execute permissions to the user for the folders containing Spark administrative tools (e.g., scripts to start the Spark master, worker, or history server) and core Spark binaries (such as
spark-submit,spark-shell, andpyspark). This ensures the user can run these scripts and binaries. - Starting from line 38, a shell script is copied, which handles the setup and coordination between the Spark master and worker nodes. The script is made executable and then set as the entry point to run during container startup.
The entrypoint script starts up a master, worker or history server service depending on the environment variable SPARK_WORKLOAD.
#!/bin/bash

SPARK_WORKLOAD=$1

echo "SPARK_WORKLOAD: $SPARK_WORKLOAD"

if [ "$SPARK_WORKLOAD" == "master" ];
then
  start-master.sh -p 7077
elif [ "$SPARK_WORKLOAD" == "worker" ];
then
  start-worker.sh spark://spark-master:7077
elif [ "$SPARK_WORKLOAD" == "history" ]
then
  start-history-server.sh
fi
entrypoint.sh
The default Spark config file contains these
spark.master                           spark://spark-master:7077
spark.eventLog.enabled                 true
spark.eventLog.dir                     /opt/spark/spark-events
spark.history.fs.logDirectory          /opt/spark/spark-events
spark-defaults.conf
Now that we have a docker image for Apache Spark, let's create the docker images for our other utilities, starting with Jupyterlab.
Utilities
Jupyterlab
Jupyterlab provides us with a convenient interface to use our Spark cluster. We will run Jupyterlab as a separate service using Docker Compose, built upon the same hetzner-base image we used for Spark.
jupyterlab.Dockerfile
FROM python:3.11-bullseye AS python-slim

COPY requirements/requirements.txt .
RUN pip3 install --no-cache-dir -r requirements.txt

FROM hetzner-base

COPY --from=python-slim /usr/local/lib/python3.11/site-packages /usr/local/lib/python3.11/site-packages
COPY --from=python-slim /usr/local/bin /usr/local/bin

ARG pyspark_version=3.5.1

RUN pip3 install --no-cache-dir wget pyspark==${pyspark_version} jupyterlab

WORKDIR ${SHARED_WORKSPACE}

CMD jupyter lab --ip=0.0.0.0 --port=8888 --no-browser --allow-root --NotebookApp.token=
In this multi-stage build, we transfer the necessary Python dependencies from the first stage to the final stage. Next, we install pyspark and jupyterlab, and configure JupyterLab to run in headless mode on port 8888.
Llama-3.1 8B Instruct
LLMs are highly useful when working with large datasets. They can generate optimized SQL queries, parse and interpret log files, and create database schemas and structures. For our Spark cluster, we’ve deployed the Llama-3.1 8B Instruct model using llamafile. This setup is containerized and runs as a service using Docker Compose. I've detailed the service setup extensively here.
Docker Compose
Now that we have all of our services ready as docker images, let's orchestrate them using Docker Compose.
volumes:
  shared-workspace:
    name: "Distributed-FS"
  spark-logs:
    name: "Spark-Logs"

services:
  llama8b:
    container_name: llama8b
    image: llama8b
    ports:
      - "9090:9090"

  jupyterlab:
    container_name: jupyterlab
    image: jupyterlab
    volumes:
      - shared-workspace:/opt/workspace
      - spark-logs:/opt/spark/spark-events
    ports:
      - "8888:8888"

  spark-master:
    image: spark-cluster
    container_name: spark-master
    entrypoint: ["/opt/spark/entrypoint.sh", "master"]
    healthcheck:
      test: ["CMD", "curl", "-f", "http://localhost:8080"]
      interval: 5s
      timeout: 3s
      retries: 3
    volumes:
      - shared-workspace:/opt/workspace
      - spark-logs:/opt/spark/spark-events
    env_file:
      - .env.spark
    ports:
      - "8080:8080"
      - "7077:7077"

  spark-history-server:
    image: spark-cluster
    container_name: spark-history
    entrypoint: ["/opt/spark/entrypoint.sh", "history"]
    depends_on:
      - spark-master
    volumes:
      - shared-workspace:/opt/workspace
      - shared-workspace:/opt/spark/spark-events
    env_file:
      - .env.spark
    ports:
      - "18080:18080"

  spark-worker:
    image: spark-cluster
    entrypoint: ["/opt/spark/entrypoint.sh", "worker"]
    depends_on:
      - spark-master
    volumes:
      - shared-workspace:/opt/workspace
      - spark-logs:/opt/spark/spark-events
    env_file:
      - .env.spark
    environment:
      - SPARK_WORKER_CORES=3
      - SPARK_WORKER_MEMORY=12g
      - SPARK_EXECUTOR_MEMORY=4g
      - SPARK_EXECUTOR_CORES=1
docker-compose.yml
In this setup, we've defined the volumes and services to be run, each using a specified Docker image. Docker volumes are configured accordingly, and each service is accessible via the designated port numbers within the Docker network.
The .env.spark file contains
SPARK_NO_DAEMONIZE=true
To build our Spark cluster images, run the build.sh file containing:
docker build \
  -f docker/hetzner-base.Dockerfile \
  -t hetzner-base .

docker build \
  -f docker/spark-cluster.Dockerfile \
  -t spark-cluster .

docker build \
  -f docker/jupyterlab.Dockerfile \
  -t jupyterlab .

docker build \
  -f docker/llama8b.Dockerfile \
  -t llama8b .
build.sh
Finally, run docker-compose up --scale spark-worker=2. This will set up a Spark cluster with 2 worker nodes, along with the jupyterlab and llama service we have created.
Take it for a spin!
You can find all this code and some more in the GitHub repository below!
 GR-Menon
To set up the Spark cluster mentioned in this blog, you can:
- Clone the repository
git clone https://github.com/GR-Menon/Spark-Bazaar
- Navigate to
Spark Cluster-Hetzner, and run:
chmod +x build.sh
./build.sh
- Change the Spark worker service parameters in the docker-compose.yml according to the hardware available to you. Reduce the number of cores and RAM allocated to the worker service by setting:
spark-worker:
    environment:
        - SPARK_WORKER_CORES=1
        - SPARK_WORKER_MEMORY=2g
        - SPARK_EXECUTOR_MEMORY=1g
        - SPARK_EXECUTOR_CORES=1
- To run the cluster, run the command:
docker compose up --scale spark-worker=2
- Finally, open
http://localhost:8888on your browser. You should now have access to a running Jupyterlab interface. You can access the other services at port numbers 8080 (Spark Master WebUI), 18080 (Spark History Server) and 9090 (Llama-3.1 8B Instruct).
Conclusion
Phew! That was a lot to cover, but you should now have your very own Apache Spark cluster up and running. While setting up a Spark cluster might seem overwhelming at first, breaking it down into smaller, manageable steps—like we've done here—makes the process much easier. In upcoming blogs, we’ll explore some exciting tasks and projects you can tackle with your new Spark cluster. Stay tuned for more!
If this looked interesting to you, we can't wait to share more on what we have been working on! Apply to gain access to our cluster 👇!
Access Our Spark Cluster
Interested in enhancing your data engineering skills? Apply now to gain access to our Spark cluster:
- Hands-on Learning: Experience the power of learning on an actual Spark cluster.
- End-to-End Workflows: Build and test complete data processing workflows.
- Jupyter Notebooks: Use Jupyter Notebooks to write and test your PySpark and SparkSQL code.
- Curriculum Access: From beginner to advanced, follow a structured curriculum to solve complex problems.
- Industry Datasets: Work with datasets like Movie Lens for recommender systems and Common Crawl for NLP tasks. And many more datasets available.
References
- https://spark.apache.org/docs/latest/
- https://www.davidmcginnis.net/post/spark-job-optimization-myth-5-increasing-executor-cores-is-always-a-good-idea
- https://medium.com/@tomhcorbin/understanding-apache-spark-part-1-spark-architecture-21c347bf622b
GR-Menon